在AWS上部署n8n,並結合Amazon Bedrock/MCP進行OCR
背景說明
本篇文章提供
- 兩種在aws上運行n8n的方式
- 在n8n中,如何進行OCR
- 如何透過本地AI工具,如Amazon Q CLI,透過MCP呼叫n8n,No code/Low code開發agent
建議瀏覽器
- Chrome
- Edge
Workshop 材料連結
- Workshop 實驗環境連結: <參與workshop時提供>
- 短網址:<參與workshop時提供>
- access code: <參與workshop時提供>
實作課程流程
- 實驗環境準備
- 本地aws cli 安裝
- 本地aws configure設定
1. 兩種在aws上運行n8n的方式
1-1. 使用EC2進行測試
架構說明:直接在aws預設網段、或是在private subnet(推薦),開啟一台ec2。此ec2在測試階段不需要對外開放,僅開放localhost存取。 為了讓管理者可以透過網頁連進n8n進行設定,我們會使用SSM的port-forward完成。透過此方法,使用者無需進行跳板機或是開放網際網路連線,有效避免資安疑慮,簡化設定。
Create an ec2
Skip. Instead of SSH to the ec2, we can use the SSM to connect to it. Ref to: https://docs.aws.amazon.com/AWSEC2/latest/UserGuide/connect-with-systems-manager-session-manager.html
Install docker
Once accessed the ec2, let’s install the docker.
1
2
3
4
sudo yum update -y
sudo yum install -y docker
sudo service docker start
sudo usermod -a -G docker ec2-user
Validate docker is installed
1
2
3
4
exit
sudo -i
su - ec2-user
docker ps
Install n8n
1
2
docker volume create n8n_data
docker run -d --restart unless-stopped --name n8n -p 5678:5678 -v n8n_data:/home/node/.n8n docker.n8n.io/n8nio/n8n
Connect to n8n using port forward
from your local laptop (with aws cli installed and configured)
1
2
3
aws ssm start-session --target <instance_id.e.g.i-xxxxxxxx> \
                       --document-name AWS-StartPortForwardingSession \
                       --parameters '{"portNumber":["5678"],"localPortNumber":["5678"]}'
1-2. 使用EKS進行生產部署
Install EKS cli tool on your laptop
1
2
brew tap weaveworks/tap
brew install weaveworks/tap/eksctl
ref: https://eksctl.io/installation/
Create an EKS cluster with auto mode
1
eksctl create cluster --name=n8n --region ap-east-2 --enable-auto-mode
wait for 20 minutes
Configure network security set up
Identify EKS cluster sg: Locate the eks cluster security group: e.g. eks-cluster-sg-n8n-107556
Create a ALB sg: Create security group and note the sg id. e.g. sg-02f03fe8a1019f202
– Update the n8n-ingress.yaml so the Ingress(i.e. ALB) will use this ALB sg.
– Edit the ALB sg to allow HTTP access only from your trusted ip. This will be used to limit access to your ALB. – Edit the EKS cluster sg to allow All access from ALB sg.
Configure Postgres
Aurora (PostgreSQL Compatible)
- name: n8n-cluster
- Serverless v2
- When configure the secuirty group, allow the eks-cluster-sg-n8n-107556 to access it
Configure EKS
- create default stroage class
1
2
3
4
5
6
7
8
9
10
11
apiVersion: storage.k8s.io/v1
kind: StorageClass
metadata:
name: auto-ebs-sc
annotations:
  storageclass.kubernetes.io/is-default-class: "true"
provisioner: ebs.csi.eks.amazonaws.com
volumeBindingMode: WaitForFirstConsumer
parameters:
type: gp3
encrypted: "true"
1
k apply -f ../../eks/default-stroage-class.yaml
https://docs.aws.amazon.com/eks/latest/userguide/create-storage-class.html
- Create Ingress Class:
1
2
3
4
5
6
7
8
apiVersion: networking.k8s.io/v1
kind: IngressClass
metadata:
labels:
  app.kubernetes.io/name: LoadBalancerController
name: alb
spec:
controller: eks.amazonaws.com/alb
https://docs.aws.amazon.com/eks/latest/userguide/auto-elb-example.html
- Deploy K8s:
1
git clone https://github.com/n8n-io/n8n-hosting/tree/main/kubernetes
Replace needed files
Remove n8n-service.yaml
Add n8n-ingress.yaml:原本使用LoadBalancer. 使用ClusterIP即可
1
2
3
4
5
6
7
8
9
10
11
12
13
14
15
16
17
18
19
20
21
22
23
24
25
26
27
28
29
30
apiVersion: networking.k8s.io/v1
kind: Ingress
metadata:
  name: n8n-ingress
  namespace: n8n
  annotations:
    alb.ingress.kubernetes.io/scheme: internet-facing
    alb.ingress.kubernetes.io/target-type: ip
    alb.ingress.kubernetes.io/listen-ports: '[{"HTTP": 80}]'
    # Security group binding - replace sg-xxxxxxxxx with your actual security group ID
    alb.ingress.kubernetes.io/security-groups: sg-02f03fe8a1019f202
    # Health check settings
    alb.ingress.kubernetes.io/healthcheck-path: /
    alb.ingress.kubernetes.io/healthcheck-interval-seconds: '15'
    alb.ingress.kubernetes.io/healthcheck-timeout-seconds: '5'
    alb.ingress.kubernetes.io/success-codes: '200-399'
    alb.ingress.kubernetes.io/healthy-threshold-count: '2'
    alb.ingress.kubernetes.io/unhealthy-threshold-count: '2'
spec:
  ingressClassName: alb
  rules:
    - http:
        paths:
          - path: /
            pathType: Prefix
            backend:
              service:
                name: n8n
                port:
                  number: 5678
n8n-service-updated.yaml:使用Ingress提供對外服務
1
2
3
4
5
6
7
8
9
10
11
12
13
14
15
16
apiVersion: v1
kind: Service
metadata:
  labels:
    service: n8n
  name: n8n
  namespace: n8n
spec:
  type: ClusterIP
  ports:
    - name: "http"
      port: 5678
      targetPort: 5678
      protocol: TCP
  selector:
    service: n8n
1
2
cd ./n8n-hosting/kubernetes
kubectl apply -f ./ -R
- use portforwad to access n8n from local:
1
kubectl port-forward -n n8n deployment/n8n 5678:5678
2.在n8n中,如何進行OCR
背景
我們假設使用者已經將檔案上傳到s3了。在此步驟,會選擇該檔案,並呼叫Bedrock進行OCR。 後續可以再透過s3 event notification + webhook的方案自動觸發; 或是透過3的方式以agent來整合流程。
權限準備
- Bedrock API Key
- IAM access key, with s3 IAM Policy
Workflow 建置
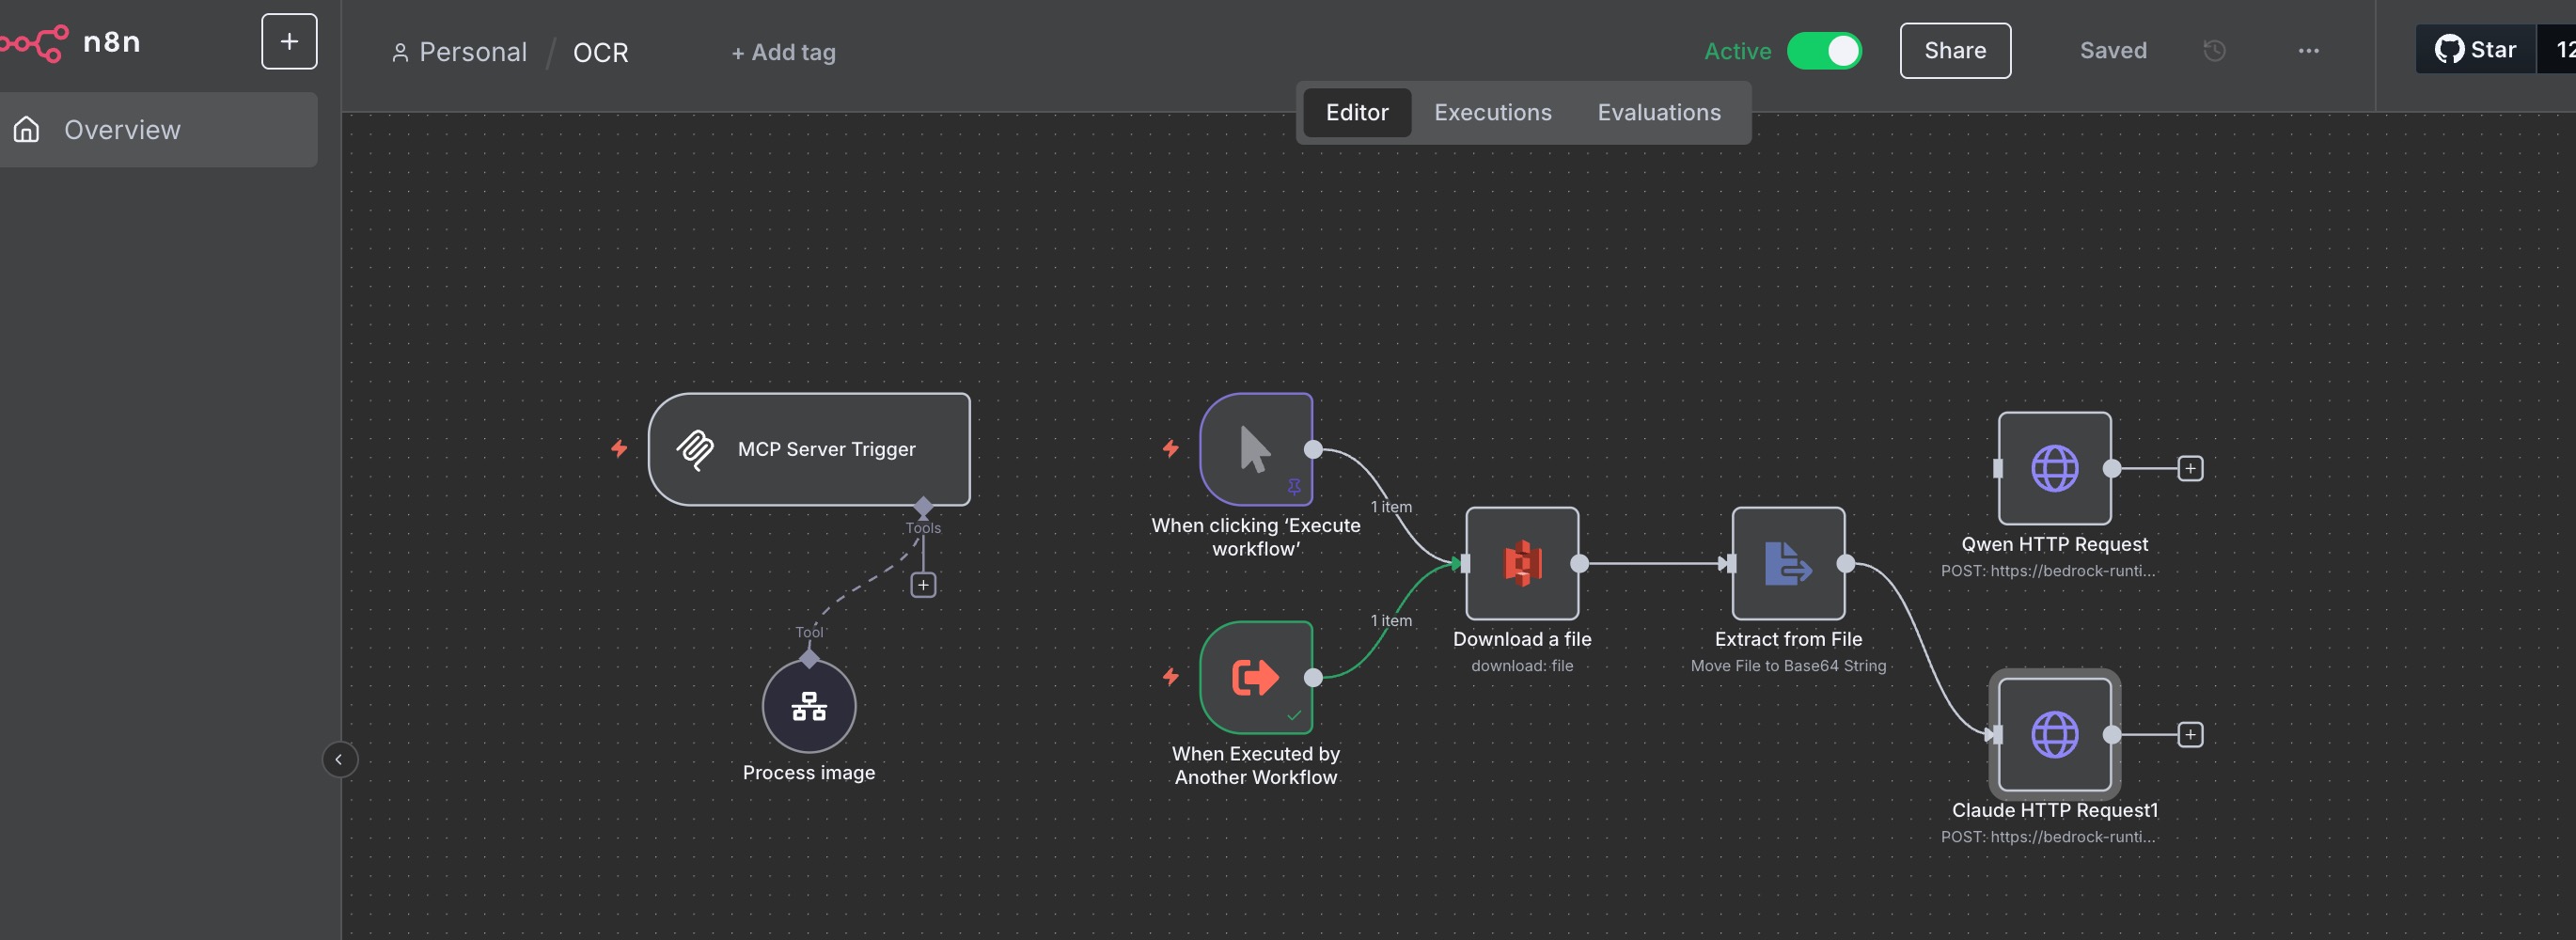
- 建立 “When clicking ‘Execute workflow’” 先建立Mock Output:
1
2
3
4
5
6
7
8
[
{
"s3_bucket":
"playground-lenlin-us-east1-xxx",
"s3_key":
"n8n/20250527-Snack.jpeg"
}
]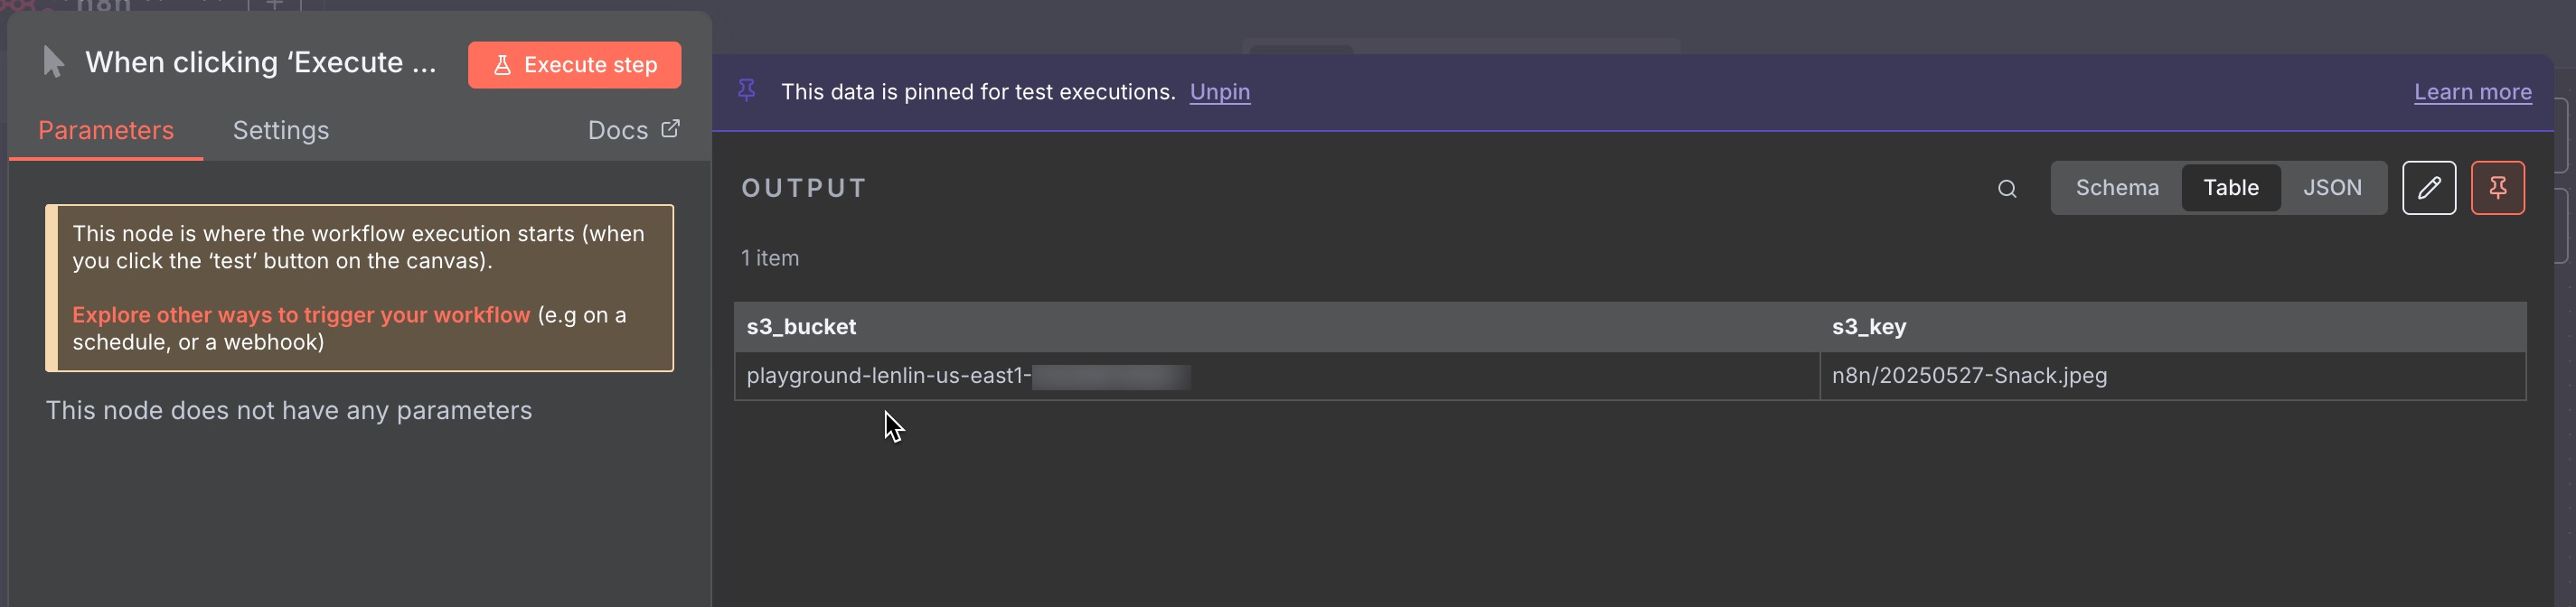
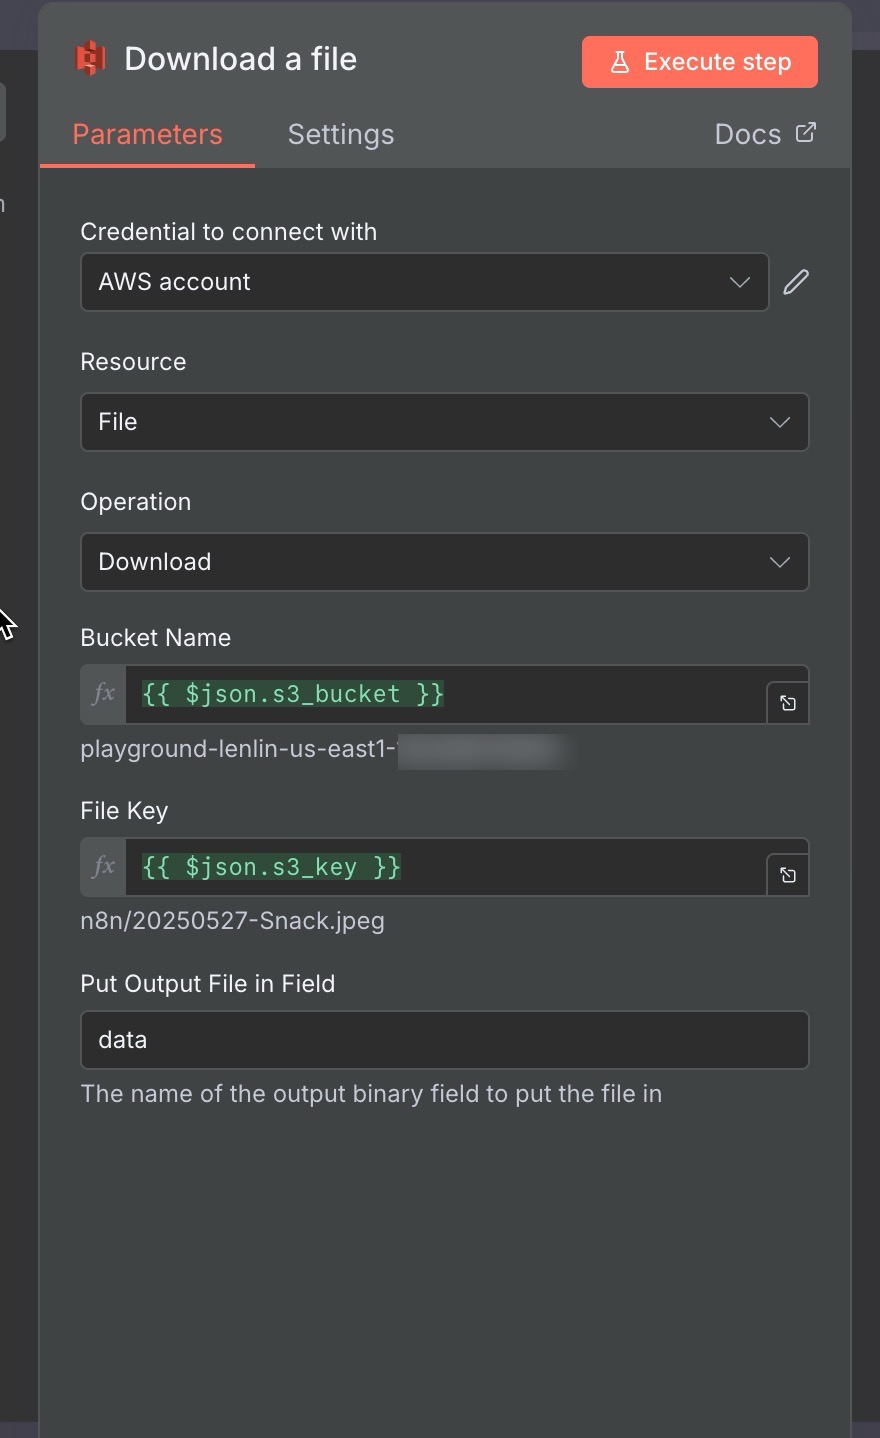
- 建立S3-> Download a file
- 建立AWS Credential
- Bucket name:{{ $json.s3_bucket }}
- File Key: {{ $json.s3_key }}
Put Output File in Field: data
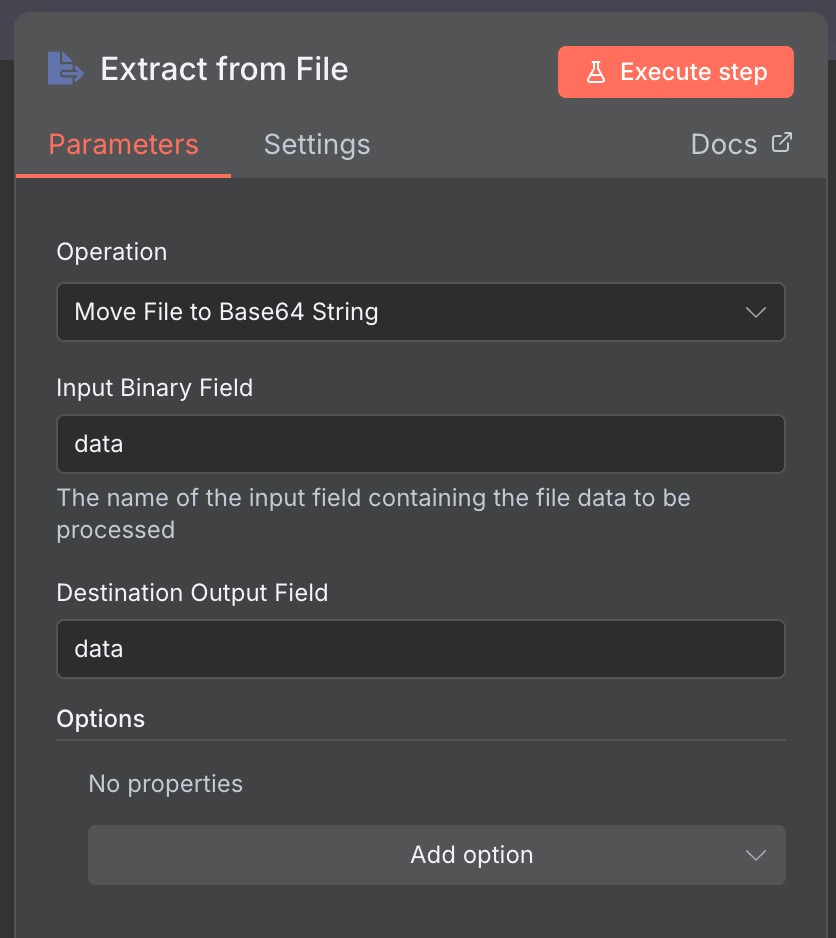
- 建立 “Extract from File”
- Operation: Move File to Base64 String
- Input Binary Field: data
Destination Output Field: data
- 建立 “HTTP Request”
- Method: POST
- URL: https://bedrock-runtime.us-east-1.amazonaws.com/model/arn%3Aaws%3Abedrock%3Aus-east-1%3A182399718165%3Ainference-profile%2Fus.anthropic.claude-3-7-sonnet-20250219-v1%3A0/invoke
格式是https://bedrock-runtime.{region}.amazonaws.com/model/{model_id}/invoke 。其中,model_id需要經過URL Encode。可以透過q cli協助。
Bedrock有兩種呼叫模型的方式,分別是invoke_model和converse API。在任務行的情境中,建議使用invoke_model,支援的模型更廣。例如,可以呼叫fine-tuned NOVA model, 或是託管的Qwen 2.5 VL。
- Authentication: Predefined Credential Type
- Credential Type: Bearer Auth
- Bearer Auth: Bearer Auth account (api key from Bedrock)
- Send Headers: accept: application/json
- Send Body: JSON / Using JSON
1 2 3 4 5 6 7 8 9 10 11 12 13 14 15 16 17 18 19 20 21 22 23
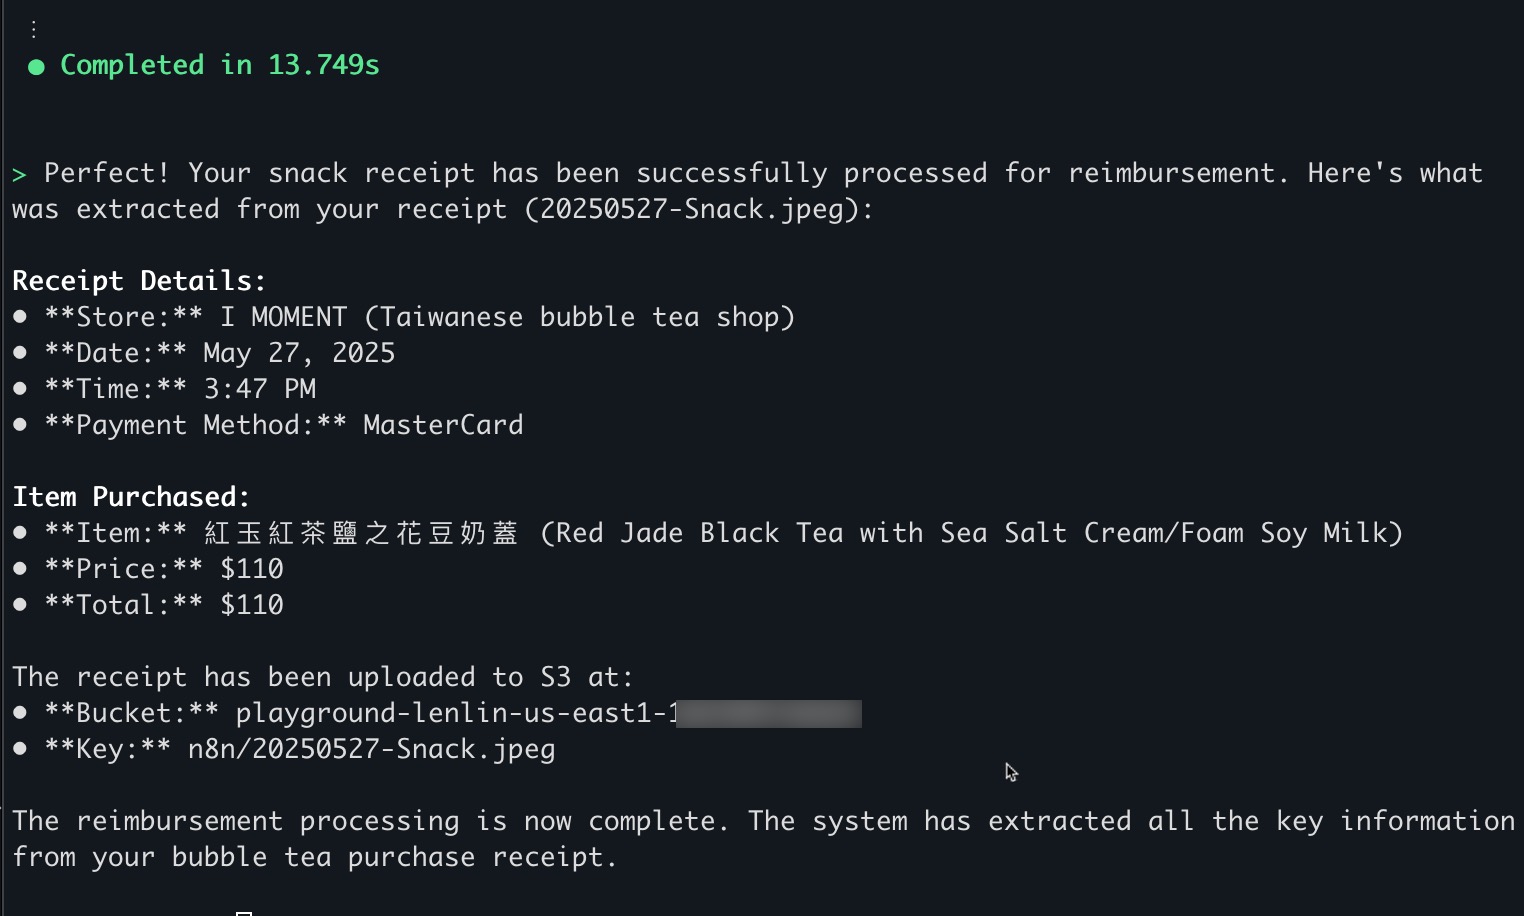
{ "anthropic_version": "bedrock-2023-05-31", "max_tokens": 4096, "messages": [ { "role": "user", "content": [ { "type": "image", "source": { "type": "base64", "media_type": "image/jpeg", "data": "{ {$json.data}}" } }, { "type": "text", "text": "get the item's name, price in an array, and total. " } ] } ] }
點擊 Execute Workflow 觀察結果
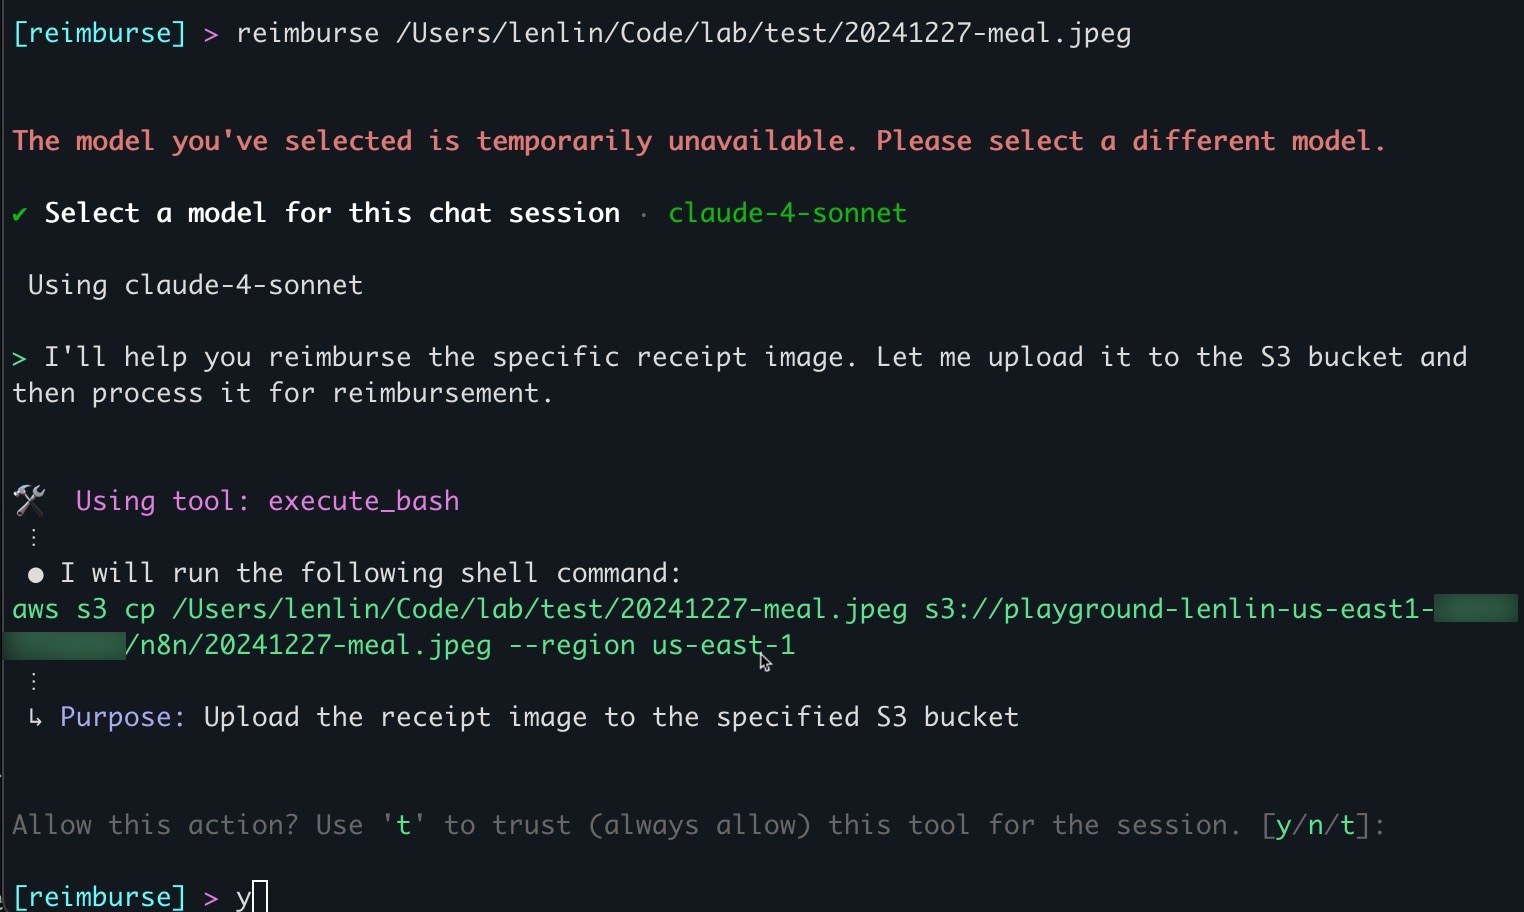
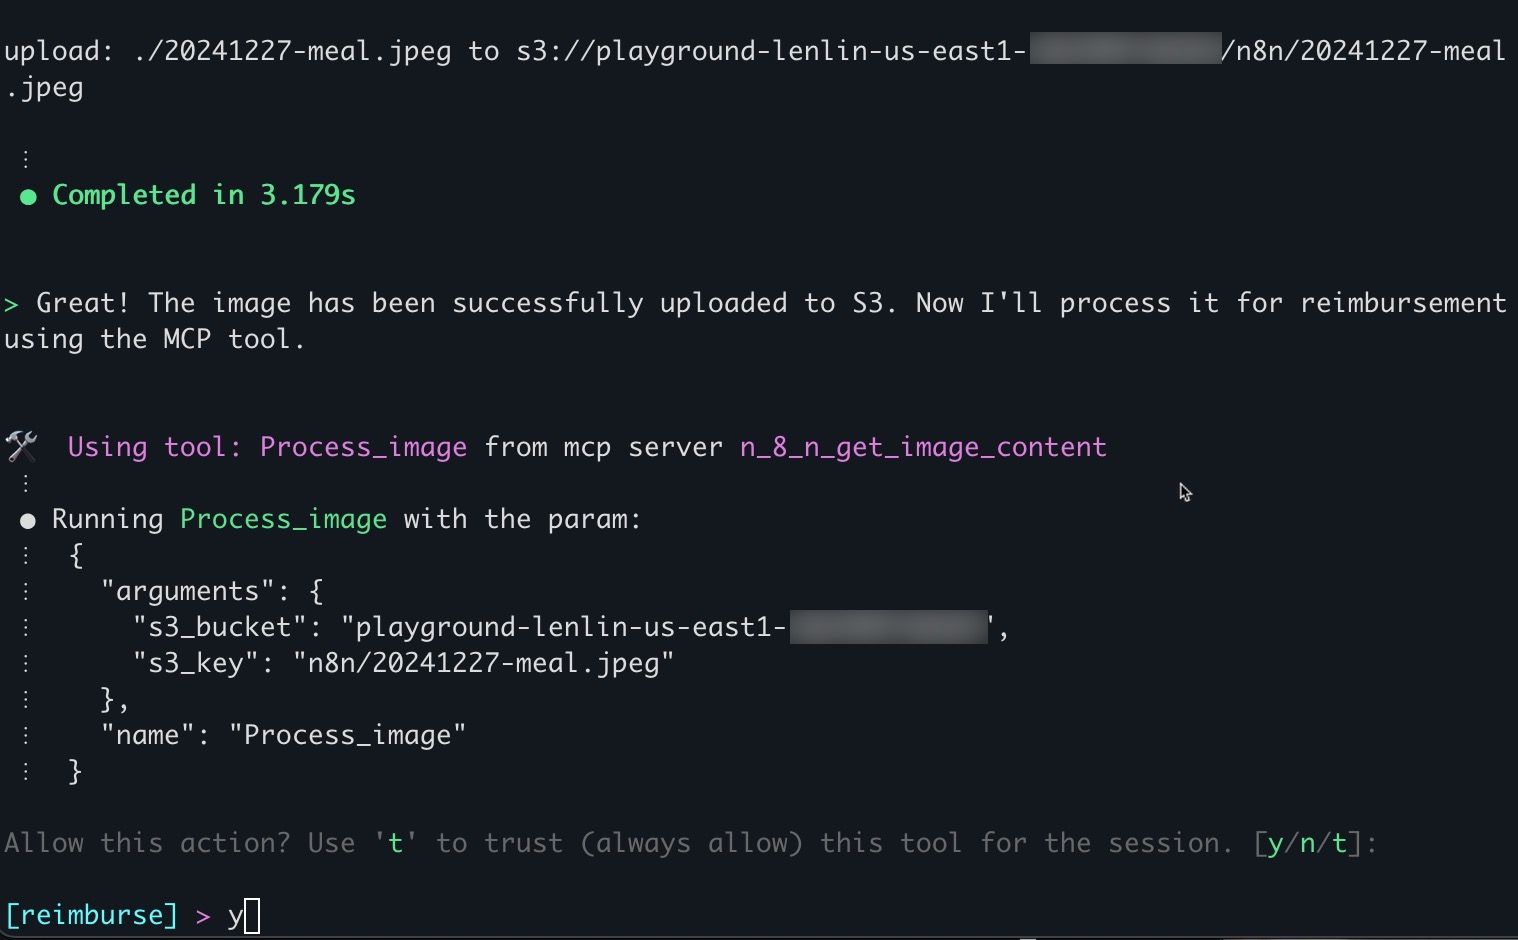
3. 如何透過本地AI工具,如Amazon Q CLI,透過MCP呼叫n8n,No code/Low code開發agent
3-1 設定MCP server
- 建立 “MCP Server Trigger” Node
- 複製Production URL備用
右上角切換為Active
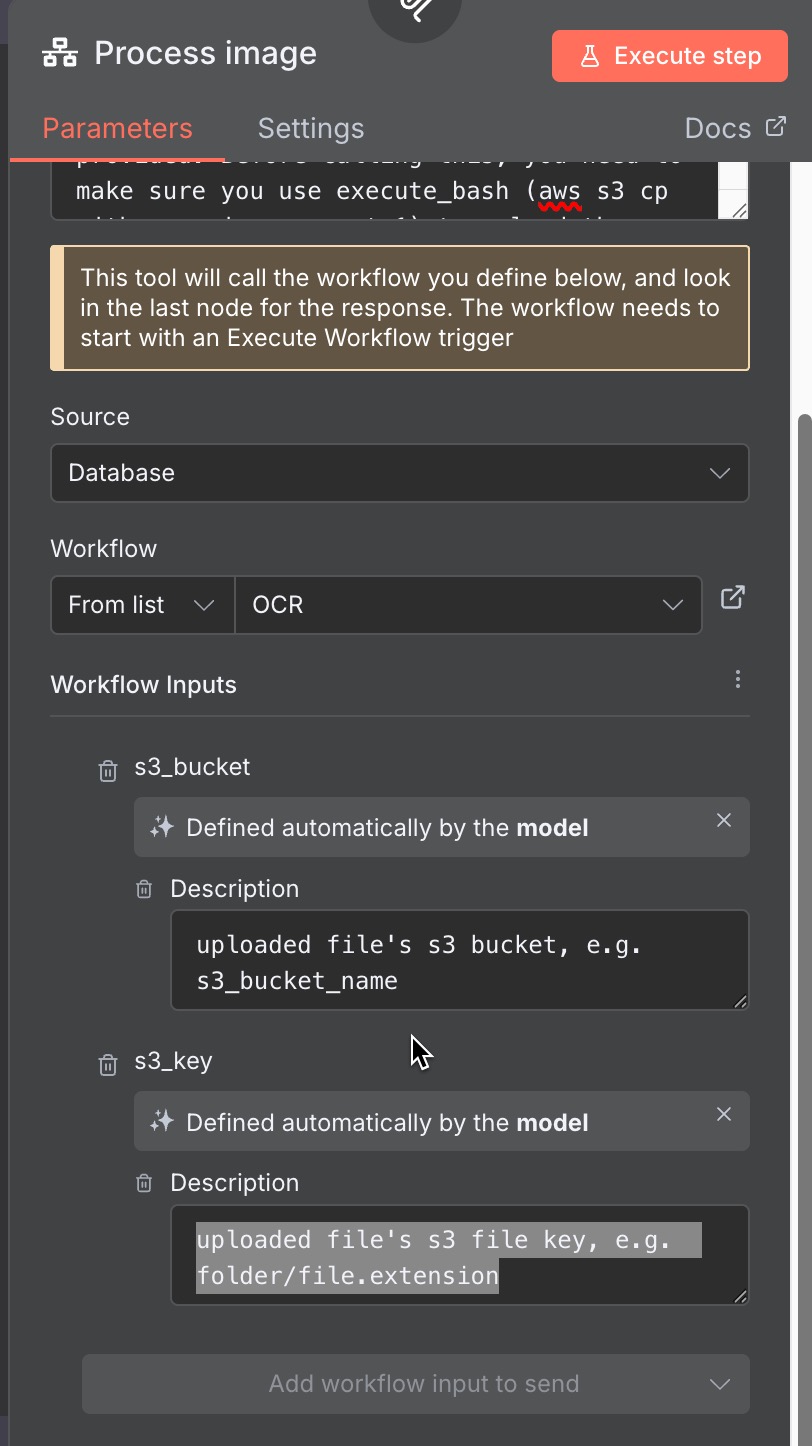
新增 “Call n8n Workflow Tool” Tool
- Description: (取代<>部分)
1
Call this tool to reimburse an item user provided. Before calling this, you need to make sure you use execute_bash (aws s3 cp with --region us-east-1) to upload the items to s3 and get the s3_bucket and s3_key. You should always upload to "s3://<your folder path>", so the s3_bucket is "<bucket_name>, and the s3_key is f"<folder>/{file_name}"
-> 這個會提供給MCP Client作為schema
- Workflow: 選擇目前Workflow
- Workflow Inputs: Refresh ** s3_bucket:
- Defined automatically by the model.
- description: uploaded file’s s3 bucket, e.g. s3_bucket_name -> 這個會提供給MCP Client作為schema
** s3_key:
- Defined automatically by the model.
description: uploaded file’s s3 file key, e.g. folder/file.extension -> 這個會提供給MCP Client作為schema
Rename the node as “Process Image”
- 建立 “ExecuteSub-workflow” Node
- 加到Download a file前
- Input data mode: Define using JSON example:
1
2
3
4
{
"s3_bucket": "uploaded data's s3 bucket",
"s3_key": "uploaded data's s3 file key"
}
3-2 設定MCP Client
安裝q cli
設定mcp
vi ~/.aws/amazonq/mcp.json 添加以下設定:
1
2
3
4
5
6
7
"n8n-get-image-content": {
    "command": "npx",
    "args": [
        "mcp-remote",
        "先前production url<http://localhost:5678/mcp/2035a31e-aacb-4475-bae3-58a0c14461e4>"
    ]
}
schema 檢查:
1
2
q chat
/tools schema
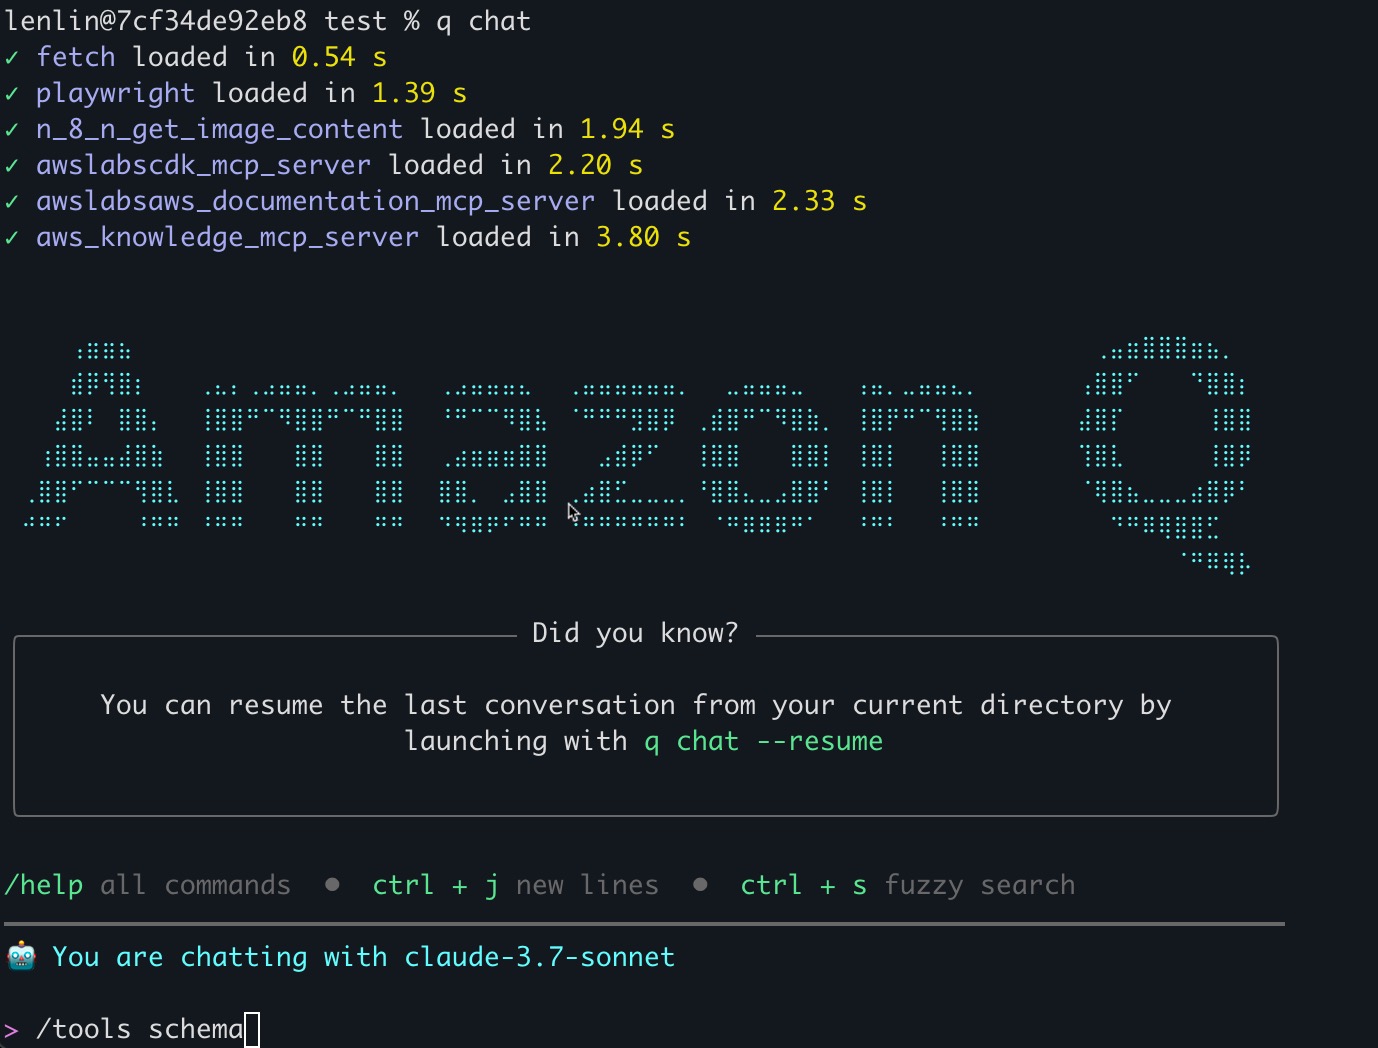 應該會看到mcp server+tools list
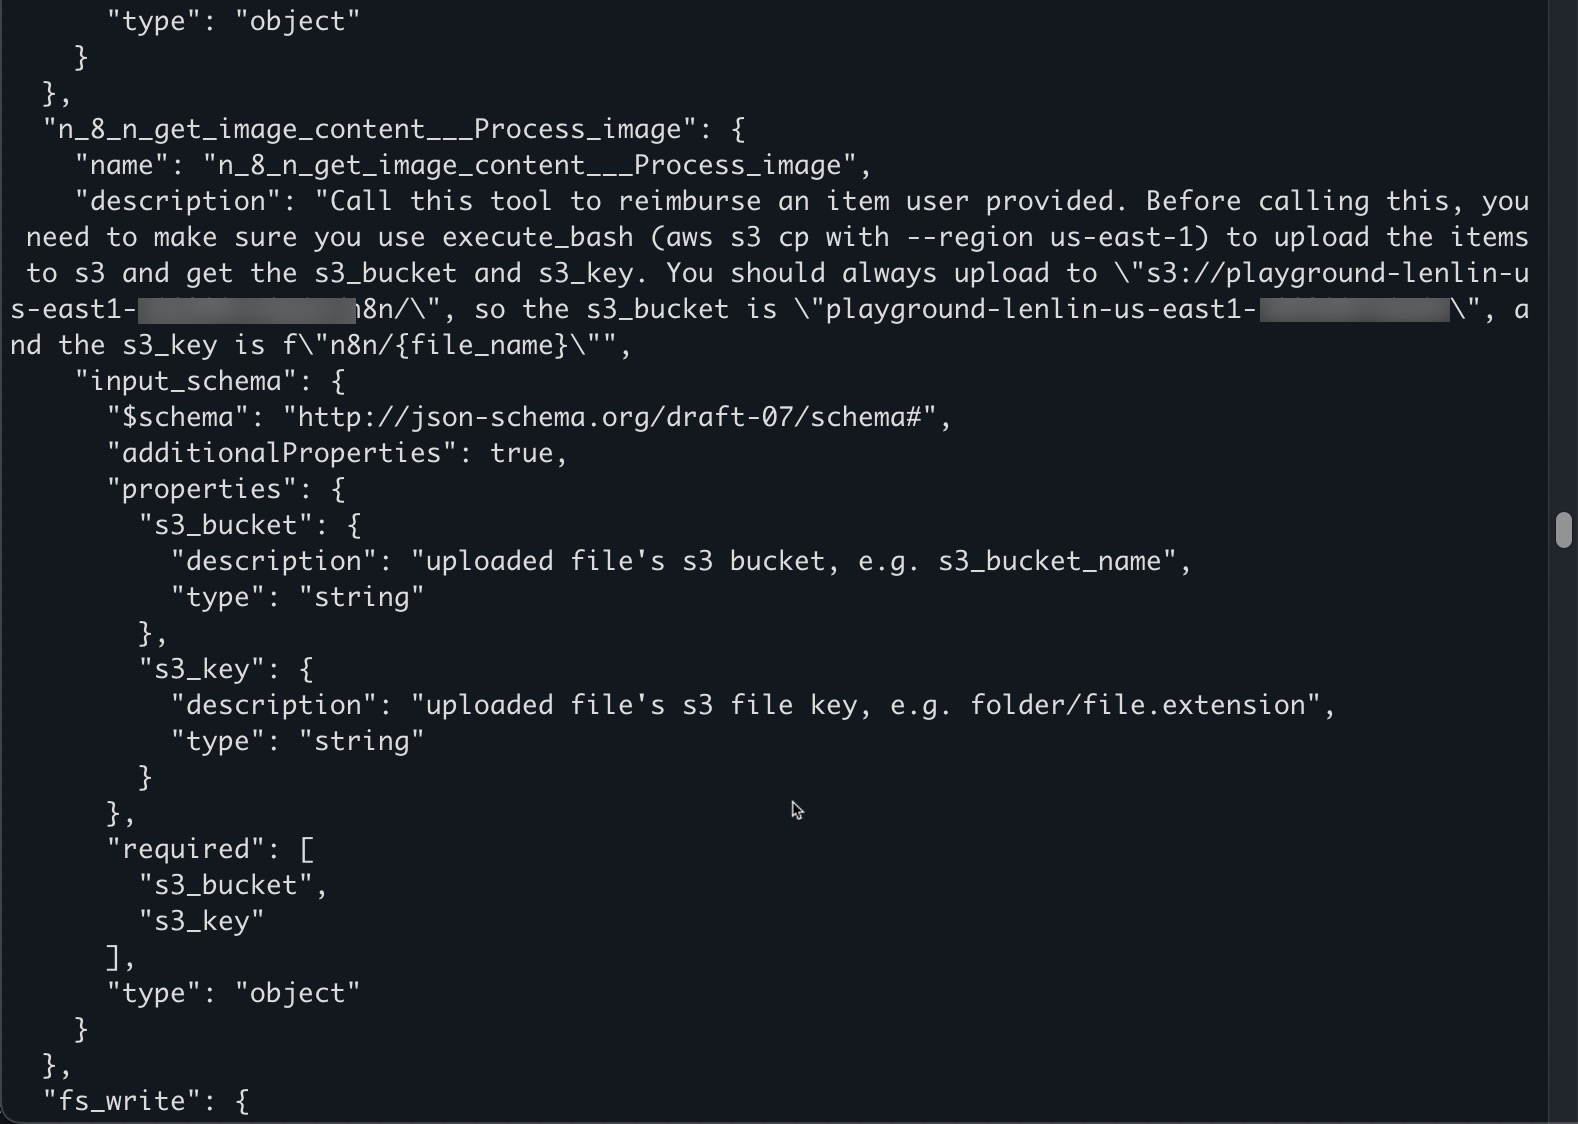
設定profile & context
建立一個reimbursement_agent.md,提供給q作為agent context。
You are an reimbursement agent. If the user wants to reimburse items, they will provide an image or a folder. You need to upload items to s3 bucket, "playground-lenlin-us-east1-xxx ", under folder "n8n/". Then, you should format the file key, and provide 1."bucket" and 2."key" to the mcp tools so it can process the reimbursement. The mcp tool can process only 1 file at a time.
1
2
3
/profile create reimbusement
/profile set reimbusement
/context add <file_path>
測試
1
q chat "reimburse <file_path_of_image>"